In this article we’ll look at how to configure RBL filters on Exchange 2016 and 2013. Let’s remember what RBL is. RBL(Realtime Blackhole List) is a service that stores the database containing a list of IP addresses of mail servers marked as spammers. RBL is the most often accessed over DNS protocol so these services are also called DNSBL (DNS Block Lists).
When receiving an e-mail from an unknown sender, the email server can automatically check these lists and block the e-mail from the IP addresses listed in the RBL service database. If the sender’s address match with the value from one of the RBL lists, your Exchange server returns an SMTP error message 550 5.x.x as the response to the RCPT TO command, and the sender will receive a Non delivery report (NDR).
In Exchange 2013 and 2016, the Connection Filtering agent is responsible for blocking the connections based on the lists of IP addresses. The Connection Filtering agent includes:
- IP Block Lists – a black list of IP addresses from which the email must not be accepted (blocked senders);
- IP Allow Lists – a white list of IP addresses (allowed senders);
- RBL Providers – the list of RBL providers.
The first two lists are static and configured by the Exchange administrator manually. The list of RBL providers contains the list of third-party RBL services to be checked when receiving an e-mail message.
In Exchange 2023/2010, the anti-spam filtering could be enabled using the Install-AntispamAgents.ps1 script. Both filtering agents (Connection Filtering and Content Filtering) installed on the same server with Hub Transport role. In Exchange 2013, the transport role is divided into two components: Front End Transport and Back End Transport, and the anti-spam filtering feature is divided into two parts. The Front End server performs Connection Filtering and the Back End server does the Content Filtering (including the IMF filter – Exchange Intelligent Message Filter and the virus-detecting agent – Malware Agent).
In Exchange 2013, if the CAS and Mailbox roles are installed on the same server, the Install-AntispamAgents.ps1 script installs only the Content Filtering agent. It means that the RBL filtering won’t be available.
To install the Connection Filtering agent, use the Install-TransportAgent cmdlet:
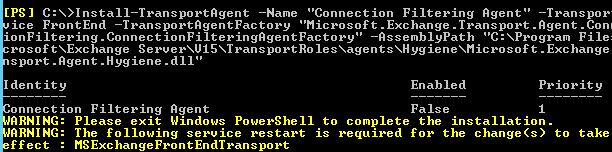
Install-TransportAgent -Name "Connection Filtering Agent" -TransportService FrontEnd -TransportAgentFactory "Microsoft.Exchange.Transport.Agent.ConnectionFiltering.ConnectionFilteringAgentFactory" -AssemblyPath "C:\Program Files\Microsoft\Exchange Server\V15\TransportRoles\agents\Hygiene\Microsoft.Exchange.Transport.Agent.Hygiene.dll"
Because in Exchange 2016, all roles (except for Edge Transport) are merged, so if you don’t have a dedicated server with the Edge Transport role, you will have to install antispam agents using the install-AntispamAgents.ps1 script on all servers. Then for the Exchange Transport service you need to specify the addresses of internal SMTP servers, which should be ignored when checking for spam:
Set-TransportConfig -InternalSMTPServers @{Add="192.168.1.25","192.168.101.25"}

After the agent is installed, you need to enable it and restart the Front End Transport service:Enable-TransportAgent -TransportService FrontEnd -Identity "Connection Filtering Agent"
Restart-Service MSExchangeFrontEndTransport

To make sure that the Connection Filtering agent is installed and running, do the following:Get-TransportAgent -TransportService FrontEnd
Next you need to specify a list of RBL providers to be used.Note. Now the most popular RBL providers are Spamhaus and SpamCop.Add-IPBlockListProvider -Name zen.spamhaus.org -LookupDomain zen.spamhaus.org -AnyMatch $true -Enabled $True
To change the text of the NDR message returned to the sender, execute this command:Set-IPBlockListProvider zen.spamhaus.org -RejectionResponse "Your IP address is listed by Spamhaus Zen. You can delete it on page http://www.spamhaus.org/lookup/"
You can add multiple RBL providers at once, having studied their peculiarities and commercial use policies.
You can display the list of currently used RBL as follows:Get-IPBlockListProvider

You can check if a certain IP address is in the RBL list with the following command:Test-IPBlockListProvider -Identity zen.spamhaus.org -IPAddress x.x.x.x
By default the Connection Filter agent logs are saved to the folder
C:\Program Files\Microsoft\Exchange Server\V15\TransportRoles\Logs\FrontEnd\AgentLog.
You can get information about which of the RBL providers rejected the e-mail by performing a search on * .log files in this directory. To find the log file with the specified e-mail address, open the elevated cmd and run the commands:
Cd “C:\Program Files\Microsoft\Exchange Server\V15\TransportRoles\Logs\FrontEnd\AgentLog”
find /c "[email protected]" *.log | find ":" | find /v ": 0"
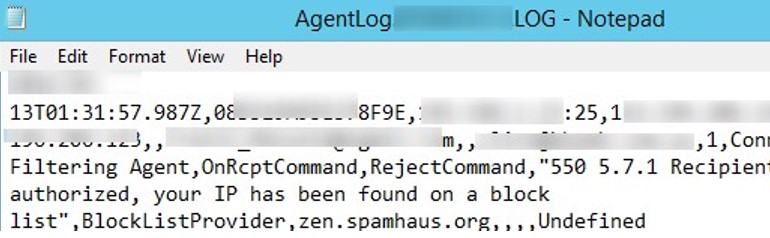
Then open the found *.log file in any text editor. Search for the rejected email address to detect the RBL provider that blocked the email and the blocking time.
This example shows that the email from [email protected] was rejected on your Exchnage server by the RBL provider zen.spamhaus.org.
[email protected],,[email protected],1,Connection Filtering Agent,OnRcptCommand,RejectCommand,”550 5.7.1 Recipient not authorized, your IP has been found on a block list”,BlockLictProvider,zen.spamhaus.org,,,

After the initial information is collected (it depends on the size of the SMTP traffic, and usually takes up to 2-3 days), the RBL filtering statistics can be displayed using the Get-AntispamTopRBLProviders.ps1 cmdlet:.\get-AntispamTopRBLProviders.ps1 -location "C:\Program Files\Microsoft\Exchange Server\V15\TransportRoles\Logs\FrontEnd\AgentLog"
The first time you start using RBL filtering, you need to carefully examine the filtering logs for false positives so as not to block emails from your partners. You can add such a trusted email addresses or domain names to the Exchange white list to bypass spam filtering:
Set-ContentFilterConfig -BypassedSenderDomains contoso1.com, contoso2.net,contoso3.co.uk
Or add the IP address of a specific SMTP server to the trusted ones:
IPAllowListEntry -IPAddress x.x.x.x
In addition, the following pre-installed PowerShell scripts can be used to obtain email filtering statistics by the Connection Filtering Agent:
- get-AntispamFilteringReport.ps1
- get-AntispamSCLHistogram.ps1
- get-AntispamTopBlockedSenderDomains.ps1
- get-AntispamTopBlockedSenderIPs.ps1
- get-AntispamTopBlockedSenders.ps1
- get-AntispamTopRBLProviders.ps1
- get-AntispamTopRecipients.ps1
To disable incoming email filtering, you need to disable the Connection Filtering Agent:
Disable-TransportAgent -TransportService FrontEnd -Identity “Connection Filtering Agent”
The RBL lists are quite effective to protect from unwanted email (spam), but in the most cases they have to be used in conjunction with other anti-spam methods to provide the robust anti-spam protection. In addition to RBL, you can manually block specific sender email addresses and domain in Exchange.