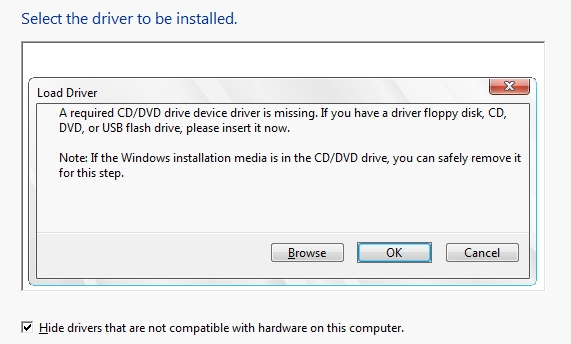
The Windows 7 RTM distribution doesn’t support USB 3.0 out-of-the-box, and you can encounter some problems with the installation of Windows 7 on a computer/laptop having USB 3.0 ports only (most modern devices released after 2015 have only USB3 ports). For example, USB keyboard and mouse may not work in Windows 7 Setup wizard, or the installer may require to load drivers for your CD/DVD drive :A required CD/DVD drive device driver is missing. If you have a driver floppy disk, CD, DVD, or USB flash drive, please insert it now.
Note: If the Windows installation media is in the CD/DVD drive, you can safely remove it for this step.
Accordingly, you cannot install Windows 7 (or Windows Server 2008 R2) from a USB drive to a computer on which all peripheral devices are connected via USB 3.0 ports.The Enhanced Host Controller Interface is not supported in the Intel chipsets starting from 100 and 200 series (B150, H110, H170, Q150, Q170, Z170, Intel Apollo Lake), similar AMD chipsets and chipsets from other vendors. Therefore USB 3.0 ports are simply not detected by the Windows 7 installer.
To install Windows 7 correctly on some computer models, you can disable USB 3.0 mode in BIOS settings by switching to USB 2.0 compatibility mode (Legacy USB 2.0). In all other cases, you will have to modify Windows 7 install distro and integrate USB 3.0 drivers for your motherboard chipset to the boot and install WIM images. Some motherboard vendors released special tools to integrate their USB drivers into your Windows 7 installation image. For example, ASRock (Win 7 USB Patcher), MSI (MSI Smart Tool), Intel (Windows USB Installation Tool for Windows 7), Gigabyte (Windows USB Installation Tool) and etc. But in this article we will show you how to manually integrate USB drivers into the Windows 7 Install image without using third-party utilities.
All the operations of modifying of the Windows 7 ISO image, described below, are performed on a computer running Windows 10.
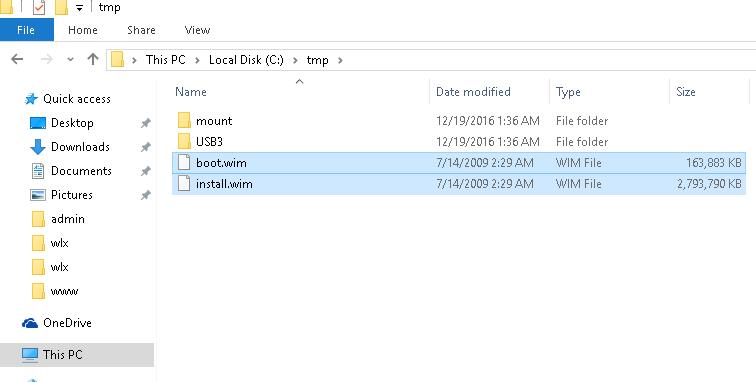
First of all, find USB 3.0 drivers for your chipset and download them from the vendor website (in our example, it is Intel® USB 3.0 eXtensible Host Controller Driver for Intel® 7 Series/C216 Chipset Family). Create a new directory c:\tmp, and create two subfolders inside it: mount and USB3. Unpack the archive with drivers to the USB3 folder. Inside the USB3 catalog you can create several subfolders with different USB 3.0 drivers for popular chipset models.
Next, you need to update the Windows 7 install image (it may an ISO file or a ready image copied to the installation USB stick). You’ll need two WIM files to be copied to the c:\tmp directory from the Windows 7 ISO image or the installation disk:
- sources\boot.wim – WinPE boot image used to install Windows on your device;
- sources\install.wim – Windows 7 image that will be installed on your computer.
Run a command prompt with the administrator privileges, and use the DISM tool to mount WinPE boot image (boot.wim) and integrate the USB 3.0 drivers into it:
dism /mount-wim /wimfile:c:\tmp\boot.wim /index:2 /mountdir:c:\tmp\mount
dism /image:c:\tmp\mount /add-driver:"c:\tmp\usb3" /recurse
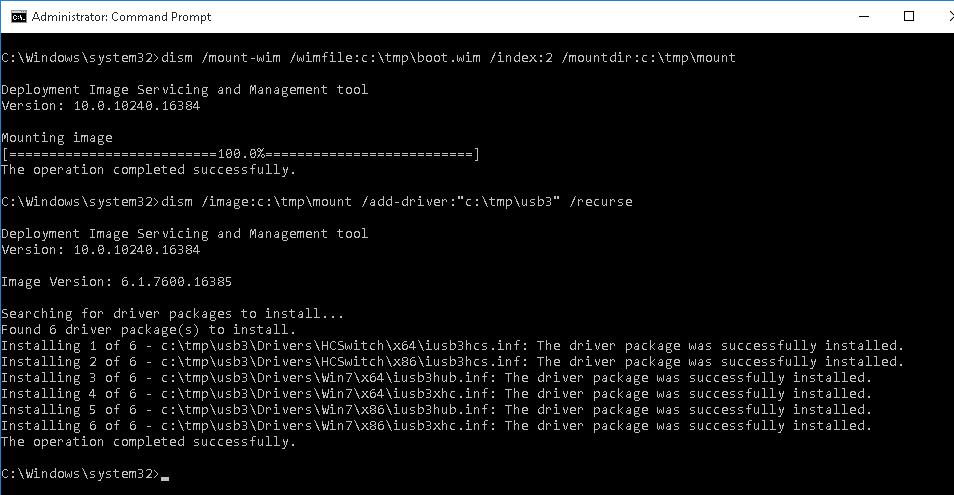
The following message indicates that the specified USB3 driver was successfully added to the boot.wim image of the Windows 7 installation environment:Installing 1 of 6 — c:\tmp\usb3\Drivers\HCSwitch\x64\iusb3hcs.inf: The driver package was successfully installed.
Save the changes in the image and unmount the boot.wim file (to avoid DISM errors, make sure that you close all File Explorer windows and the file managers, which has the c:\tmp\mount directory open):
dism /unmount-wim /mountdir:c:\tmp\mount /commit
dism /cleanup-wim
Similarly, you need to update the operating system installation image in the install.wim file. Here the main difference is that the install.wim image can contain several Windows 7 editions with different indexes. So, you will have to add drivers to that Windows edition you are going to install (or to all available Windows 7 editions in turn).
You can list the available Windows 7 editions in the install.wim image as follows:
dism /Get-WimInfo /WimFile:c:\tmp\install.wim
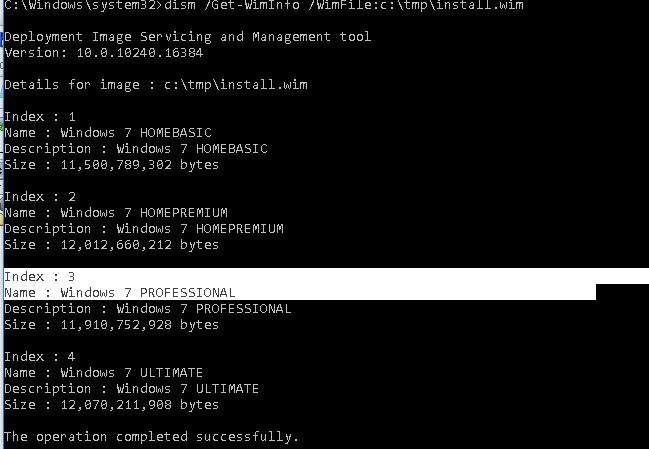
In our example, there are 4 different Windows editions in the install.wim image. We’ll add the USB 3.0 driver to Windows 7 PROFESSIONAL with the index 3 (this number will be used to address the edition using DISM).
Then add the USB 3.0 drivers to the Windows image like we did it above:
dism /mount-wim /wimfile:c:\tmp\install.wim /index:3 /mountdir:c:\tmp\mount
dism /image:c:\tmp\mount /add-driver:"c:\tmp\usb3" /recurse
dism /unmount-wim /mountdir:c:\tmp\mount /commit
dism /cleanup-wim
It remains to replace the updated install.wim and boot.wim files on the installation USB flash drive or update the ISO file, and you can use this image to install Windows 7 on computers with a USB 3.0 controller.