In the Exchange Server 2010 SP1 (and newer), special PowerShell cmdlets appeared: New-MailboxImportRequest and New-MailboxExportRequest that allow you to import or export the contents of the Exchange mailbox from / to PST file. In the previous Exchange versions, to import/export data from Exchange to PST file you had to use third party utilities (most often, the ExMerge utility was used).
In Exchange 2016, 2013 and Office 365, the Exchange development team continued to develop Exchange cmdlets for importing / exporting to PST files, slightly expanding the functionality and increasing their performance. In this article, we’ll cover typical examples of import/export data from Exchange mailboxes to personal folders files (PST).
Mailbox Import and Export Permissions in Exchange
The RBAC role “Mailbox Import Export” must be assigned to the admin account under which you want to import or export an Exchange mailboxes to PST (by default, even the Exchange administrators doesn’t have these permissions). You can assign this role to your account using the Exchange Management Shell:New-ManagementRoleAssignment –Role “Mailbox Import Export” –User fr_exchange_admin
where fr_exchange_admin – is the name of the account that gains the “Mailbox Import Export” role permissions.Tip. To make the administration easier, the “Mailbox Import Export” role is usually assigned to the AD security group. Later, if this right has to be given to another user, it will be enough to add the user account to this domain group. In this case, the command syntax is a bit different (suppose, the name of the AD group is ExchangeAdmGroup):
New-ManagementRoleAssignment -Role "Mailbox Import Export" -SecurityGroup ExchangeAdmGroup
The same can be dome from the EAC (Exchange Admin Center) graphic interface by assigning the Mailbox Import Export to the desired user or group.
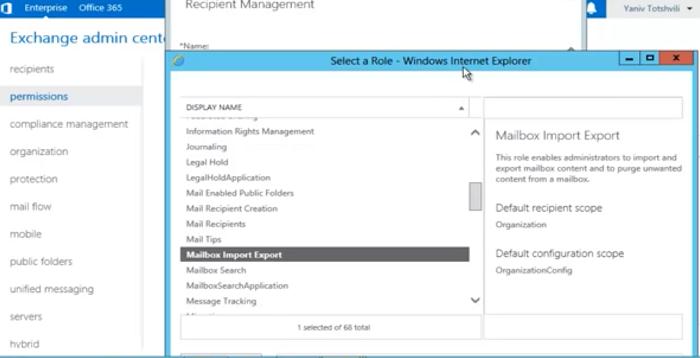
After granting RBAC permissions, restart the EAC or Management Shell console.
New-MailboxImportRequest: Importing PST Fie into Exchange Mailbox
To import a PST file to the Exchange mailbox, you need the following besides the RBAC permissions:
- The target Exchange mailbox must exist;
- The PST file must be located on the shared network folder and you have to know the full UNC path to it (don’t forget that the local file on a certain computer can be accessed via its network path like \\PCName111\C$\PST\tstmail.pst);
- The user performing the import operation must have the NTFS read permission on the network folder with the PST mail archive file.
Use the following command to import the content of a PST file from a shared folder into the user’s mailbox usertest.
New-MailboxImportRequest -Mailbox usetest -FilePath \\HQ-FS01\PST\usetest.pst
When importing into the target box, the contents of existing folders are merged, and new folders are added to the existing mail folder structure.
The contents of the PST file can be imported not into the Exchange mailbox root, but into one of existing folder of the mailbox (e. g., “Old_mail”). For example, you need to import only the contents of the Inbox folder to the target mailbox folder Old_mail:
New-MailboxImportRequest -Mailbox usetest -FilePath \\HQ-FS01\PST\usetest.pst -TargetRootFolder "Old_mail" -IncludeFolders "#Inbox#"Tip. Here is a complete list of the standard folders in the Exchange (Outlook) mailbox:
- Inbox
- SentItems
- DeletedItems
- Calendar
- Contacts
- Drafts
- Journal
- Tasks
- Notes
- JunkEmail
- CommunicationHistory
- Voicemail
- Fax
- Conflicts
- SyncIssues
- LocalFailures
- ServerFailures
After running the import command, the import request is queued for processing by the Exchange server (processing is performed on the server with the Client Access Server role). To see the import request queue, run this command:
Get-MailboxImportRequest

The import request task status (InProgress, Completed, Queued) for a certain mailbox can be obtained as follows:
Get-MailboxImportRequest mailtst
To get information about the import request status (in percent), run the command below:
Get-MailboxImportRequest | Get-MailboxImportRequestStatistics

The completed import requests can be removed from the queue with this command:
Get-MailboxImportRequest -Status Completed | Remove-MailboxImportRequest

To bulk import email items from PST files into multiple user mailboxes, you can use this command (it is assumed that the names of pst files correspond to the names of user mailboxes):
Foreach ($i in (Get-Mailbox)) { New-MailboxImportRequest -Mailbox $i -FilePath "\\HQ-FS01\PST\$($i.Alias).pst" }
If the import process fails, you can get a detailed information on its reasons from the report generated as follows:
Get-MailboxImportRequest -Status Failed | Get-MailboxImportRequestStatistics -IncludeReport | Format-List > AllImportReports.txt
In most cases, the import errors occur due to:
- Logical damage of PST file structure.
- If the user mailbox size exceeds the specified limit.
You can specify the number of bad items in PST file that can be skipped during the import. The following command will import the data from the PST file into the Exchange mailbox and skip the first ten failed items before generating an import error:
New-MailboxImportRequest -Mailbox mailtst -FilePath \\HQ-FS01\PST\usetest.pst -BadItemLimit 10
New-MailboxExportRequest: Exporting Exchange Mailbox Items to a PST File
The export of the contents of the Exchange mailbox is similar to import. To export the contents of the mailbox to a PST file, use the New-MailboxExportRequest cmdlet. To export the mailbox of mailtst user to the shared network folder (this directory has to be created in advance and you must grant read&write permissions on this folder for the Exchange Trusted Subsystem domain group), run the following command:
New-MailboxExportRequest –Mailbox mailtst –FilePath \\HQ-FS01\ExportPST\mailtst.pst

If you have to export to a PST file only email items from a specific folder, e.g., Inbox, the command looks like this:
New-MailboxExportRequest –Mailbox mailtst –FilePath \\HQ-FS01\ExportPST\mailtst.pst -IncludeFolders “#Inbox#”
To exclude a folder from exporting, use the ExcludeFolders parameter. For example, you don’t need to export deleted items to a PST file:
New-MailboxExportRequest –Mailbox mailtst –FilePath \\HQ-FS01\ExportPST\mailtst.pst -ExcludeFolders “#DeletedItems#”
Let’s consider a more complex task: suppose, you have to export all emails received after January, 1, 2019, that contain keywords “Project” and “London”.
New-MailboxExportRequest –Mailbox mailtst –FilePath \\HQFS01\ExportPST\mailtst.pst –ContentFilter {(body –like “*Project*”) –and {body –like “*London*”) –and (Received –lt “01/01/2019”)}You can also export items only from a specific folder with a search mailbox search results, obtained using the Search-Mailbox cmdlet.
The export task request also is queued on the Exchange server. To see the export task status, run this command:
Get-MailboxExportRequest -Mailbox "mailtst" | Format-List

RunspaceId : 3233f0d3-1b4b-4610-b0a2-6f29a543cc54
FilePath : \\HQFS01\ExportPST\mailtst.pst
SourceDatabase : db1
Mailbox :
Name : MailboxExport
RequestGuid : e03de01f-3333-111a-95fa-23faaf97ebf9
RequestQueue : db1
Flags : IntraOrg, Push
BatchName :
Status : Completed
Protect : False
Suspend : False
Direction : Push
RequestStyle : IntraOrg
OrganizationId :
Identity : mailtst\MailboxExport
IsValid : True
ObjectState : New
Don’t forget to periodically clean the completed requests for the export of mailboxes to PST files:
Get-MailboxExportRequest -Status Completed | Remove-MailboxExportRequestWhen exporting the user mailbox to a PST file, the user mailbox contents on the Exchange server are not cleared.
You can export multiple user mailbox in bulk. Create a csv text file of the following format:
Username, UNCPathtoPst
t.holland,\\HQFS01\ExportPST\holland.pst
d.orr,\\HQFS01\ExportPST\orr.pst
Run exporting user mailboxes into a PST files:
Import-CSV "C:\ps\user_list_export_pst.csv" | ForEach {New-MailboxExportRequest -Mailbox $_.username -FilePath $_.UNCPathtoPst